|
Maxim-X Dyna Coil Conversion |
||||||||||||||||||||||||||||||||||||||||||||||||||||||||||||||||||||||||||||||||||||||||||||||||||||||||||||||||||||||||||||
|
What You'll Need Aside from the DC1-1 Dyna Coils themselves and some common tools, there are a few things you should pickup to prepare for the Maxim-X Dyna Coil conversion. 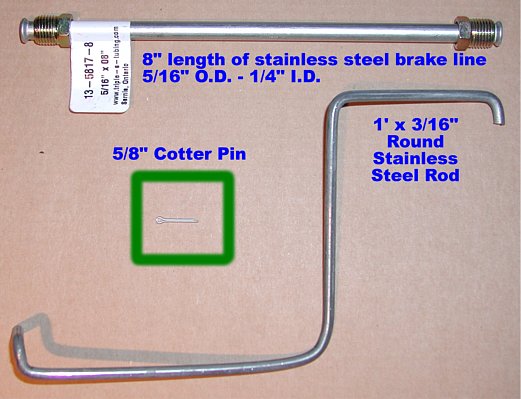 The main piece you'll need is the stainless steel rod of 3/16" diameter. Disregard the fact that the one in the picture above is bent into a weird shape - it's just because that's all I had. I didn't buy the rod at the store, I took a divider out of my file cabinet because it served my purpose. This will eventually be bent into shape to support the backs of the coils. The other parts shown above will be described below where they become necessary. One other thing you should buy in preparation for the job which isn't shown above is a tube of dielectric grease. You'll need a fair bit so you might as well begin with a full tube. Selecting Ignition Wires Naturally, you'll also need a new set of spark plug wires before you begin and depending on the type of wires you choose, sourcing might be difficult.
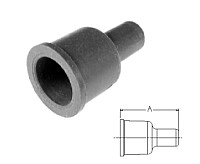
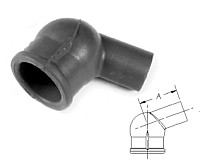
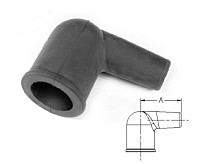
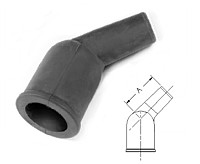
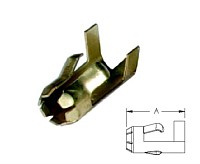
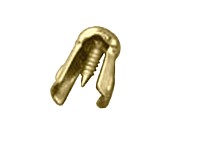
If you're interested in 7mm Copper Core wires that are a little more distinctive, there are some dual-colour braided options as well. I wanted to buy something more unique and also wanted to buy a lot more spark plug wire by the foot so I contacted a place called Magneto Parts that was able to provide what I was looking for and they did so for an especially low price per foot (75¢). Of course, there's a catch. When you buy Dyna Wires, they come with boots and connectors but when you buy spark plug wire by the foot, you're faced with having to source the boots and connectors separately... and that's not easy. If you're interested in 8mm wires, they'll almost certainly be suppression wires. The ones that work best are the spiral core type because they're more resilient and facilitate a more solid connection between the spark plug wire and the screw post of the plug caps. Most 8mm spiral core suppression wires, however, don't come equipped with the boots or connectors that are required by the Dyna Coils so, again, you're faced with having to source the boots and connectors separately... and that's not easy. Boots & Connectors Many spark plug wire sets come equipped with 90° elbow boots already attached to the wires so, for convenience sake, some people will try to do the Maxim-X Dyna Coil conversion using the supplied 90° boots. Those people will come to understand why using only 90° boots is awkward & inappropraite. Althoug it's OK to use elbow boots on the rear coil outputs, elbow boots on the front coil outputs have to be turned either up or down to get the wire around the front outputs... and up isn't possible at all. Tragically, directing the front boots down causes spark plug wire routing problems - wires invariably drape over the engine and come into contact with a number of surfaces rather than running clear of obstacles and grounded elements. A better choice of boots will circumvent those problems. A better choice is to use straight boots on only the front coil outputs and angled boots on the rear coil outputs. Straight boots will route the front spark plug wires easily past the rear coil outputs. On the left side, this will introduce a radiator reservoir access problem it's minor and can be dealt with easily (read below). The boots and connectors you'll need for proper installation of DC1-1 Dyna Coils on a Maxim-X are as follows: (4) male crimp-on or screw-in connectors, (2) straight boots (180°) and (2) elbow boots (90°, 110° or 135°). The table below provides all the detail you'll need to identify those parts:
The straight boots are required for the two coil outputs at the front and the elbow boots are required for the two coil outputs at the back. From experience I know that 90° boots will work for the back coil outputs - in fact, that's what I have on my own bike - but if you're able to source 110° elbow boots instead, those would work better... but they're nearly impossible to find. All of the Maxim-X owners who made the Dyna coil conversion with my help gave up looking for the 110° boots because they were only able to find 90° boots. They're just that elusive. A word of caution when sourcing the connectors - the guys at the parts counter don't always look at the parts they're supplying as closely as you'd like. You could easily walk off with the wrong connectors just because the various types are often quite similar despite the fact that they're not interchangeable. It's even possible to confuse some female connectors witrh the male connectors you'll be looking for so make sure you look very closely at what you're being handed (DAMHIKT) Necessary Tools Once you've collected the spark plug wires & connectors and the other pieces you'll need for mounting the coils, you're almost ready to start. You'll just need to make sure some necessary tools are handy. The tools you'll need for the job are minimal & common:
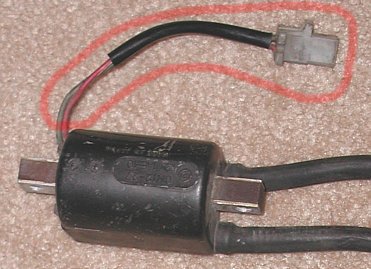
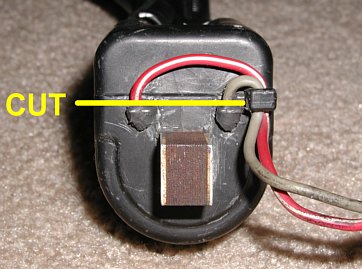
Dyna Coil Power Connections I'll start by assuming that you've already removed your stock coils and the coil bracket (aka "butterfly bracket"). Once the stock coils are in your hands, you'll still need to remove the power leads and connectors from them. Those aren't supplied with the new Dyna Coils. As shown in the pictures below, just cut the leads as close to the soldered connections as possible using side cutters, then remove the leads & plugs from the stock coils. Attach & solder the ring terminals which are supplied with the new Dyna Coils. I also recommend using heat shrink tubing to protect the coil power connections a little more... just remember to put the heat shrink tubing on the wire BEFORE you solder the ring terminal to the end (no one would ever forget that, right?
When the time comes to connect the stock coil power leads to the after-market Dyna coils, polarity is irrelevant. On the Maxim-X, the left coil has a yellow plug and serves cylinders #1 & #4, and the right coil has a grey plug and serves cylinders #2 & #3 - that's all that matters. Just keep the same colour plug on the same side (yellow left, white right). The two wires for each plug can be reversed - polarity doesn't matter. Unmodified Butterfly Bracket The easiest way to shoehorn the Dyna Coils into place on the Maxim-X is to leave the original butterfly bracket unchanged. Some guys cut the bracket and weld it into a completely different shape but I found that I could skip that and use the original bracket just as it is. The only problem with that is that the Dyna Coils are bulkier than the originals so it's only possible to mount them as usual to the front mount of the bracket. The fatter coils will then hang down at the back touching the valve covers because they are too wide to swing the back mounts up into position in the bracket. Don't worry - so far so good. Coil/Bracket Assembly Installation Although the fronts of the coils get assembled to the butterfly bracket while it's still off the bike, that IS NOT true of the rear mounts of the coils. It's absolutely IMPARITIVE that the rear mounting bolt NOT be installed before attempting to fasten the coil/bracket assembly to the bike. I discovered (the hard way) that when the rear mounting bolt is in place, the bolt and the spacer surrounding it don't clear the hump in the centre of the cam cover. That lack of clearance then makes it impossible to maneuver the coil/bracket assembly into place. When I installed my first set of Dyna coils on an X (my own), I managed to do so by first fastening the empty butterfly bracket to the bike and then bolting the coils to either side of that bracket while it was already in place. Although I managed to do it, it was especially difficult to reach the front mounting bolt with tools from either side and that meant I spent a lot of unnecessary time trying to tighten the front bolt. After sharing my experience with other XJers, one suggested that it would be easier to attach the coils to the bracket and then insert the entire coil/bracket assembly from the front of the engine after removing the radiator. Having done this conversion many times now, I have to agree that the front approach works much better. The Radiator Approach To install the fully assembled coil/bracket assembly from the front of the engine, it's necessary to first remove the radiator mounting bolts. You would already have extracted the upper bolt to remove the stock coil/bracket assembly from the bike but two lower mounting bolts remain. When removing the lower two bolts, be careful not to lose the rubber bushings - they have a tendancy to fall out and roll away. There's no need to remove the radiator shroud (the grill) from the radiator. In some cases, I've been able to leave the radiator hoses connected and simply swing the radiator as far out of the way as possible to provide access for replacing the new coil/bracket assembly. However, that's awkward.... especially if you're doing the job alone and don't have the benefit of a second or third set of hands. It's much easier to drain and remove the radiator completely before attempting the re-installation of the new coil/bracket assembly but that too has some consequences. If you drain the radiator, you'll also need to refill it again so you'll have to have the proper aluminum-safe, silicate-free, ethylene glycol based coolant handy for when you've completed the job. You'll also have to be especially careful when you re-install the radiator drain plug which is only plastic and snaps easily. It's absolutely CRITICAL to torque that plastic bolt correctly or you'll find yourself rummaging through a scrap yard for a replacement like I did. It sounds so easy but looking up the specified torque value is where the problems begin because the Maxim-X Service Manual Torque Specifications for that bolt are WRONG. Everywhere you look, the specs show ten times too much torque, so if you're going to drain and remove the radiator to provide better access for coil re-installation, be forewarned that you could damaged the bolt. Even if you're not planning the coil conversion, take the time to make the correction in your Service Manual. The correct torque specification for the plastic radiator drain plug is 3.0 N•m = 0.3 kg•m = 2.2 ft•lbs... which matches the value specified on the bolt itself. But that's not the only potential for trouble where removing the radiator is concerned. It's also possible that the bending, pulling and prying of the radiator hoses to get them off will damage the ends so that you end up with a leak. For those reasons, I prefer to try the re-installation while the radiator remains full & connected but pushed out of the way. As you're attempting the re-installation of the new Dyna coil/bracket assembly from the front of the engine, there will be many times that you think to yourself, "no way - there isn't enough clearance". In fact, I'm betting you'll say it out loud once or twice. There will be times when you're thoroughly convinced that there's no way the new coils will fit in place but rest assured, they do. I've installed several sets on Maxim-Xs as have others. The clearance is there, albeit small. Even when the coil/bracket assembly is in its final resting place, there's only about a quarter inch clearance to the cam covers but that's perfectly fine. Don't lose hope - they'll fit - and when you have the new coil/bracket assembly in place, it will look something like what you see below. 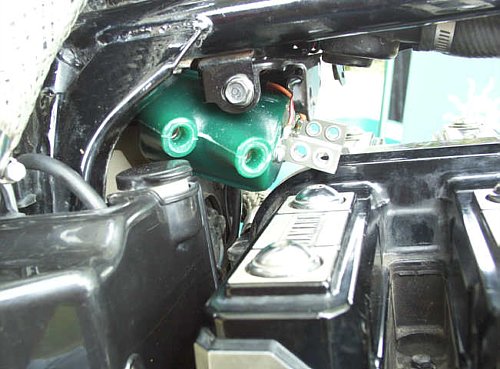 Fabricating Rear Coil Support Rod After you have the coil fronts mounted and the bracket bolted in place as shown above, then comes the time to lift the backs of the coils as far as they will go and that's what the steel rod is for... but first it has to be bent and cut into an appropriate shape and length. 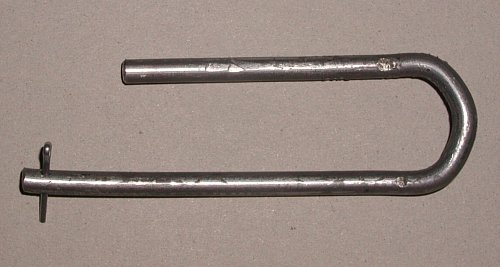 You can try to lift the coil backs as high as possible and then measure the distance to the original mounting bracket hole but from my experience it was necessary to adjust the width of the support rod always a bit narrower until the fit was tight enough to keep the coils from bouncing. It's helpful to have a vice, a hammer and something to cut the rod when you start this job. 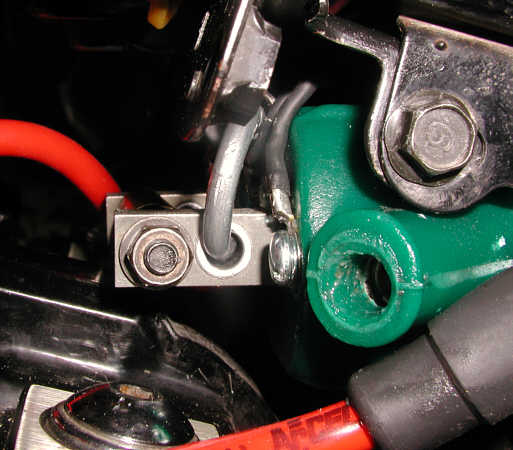 If you check the picture above, you can see that the support rod comes awfully close to the electrical connections of the Dyna Coils. On the original coils, those connections were at the front where they didn't interfere with anything but on the Dyna's they are in the way and come far too close to the support rod for my liking. 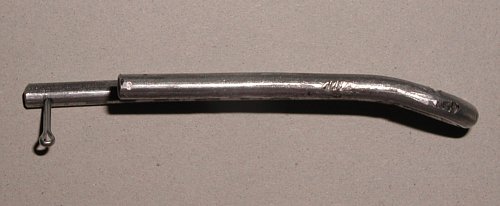 To solve the problem, I took the support rod back out and made one more bend (at the right in the picture above) which was just designed to keep the rod away from the screws on the back of the Dyna Coils. It worked like a charm in my case but it isn't always necessary. The better the initial bend in the support rod, the less likely it becomes that you'll need to add another lateral bend to increase the distance from the coil's power lead screws. In the picture you can see that one of the parts you'll need is a cotter pin. It's just about the smallest cotter pin I could find - 5/8" long - and once my support rod was bent into shape and cut to length, I simply marked a spot on the rod and drilled a hole for the cotter pin. Rear Coil Support Spacer Although the support rod holds the coil backs up, away from the engine, it does nothing to brace the coils laterally. To help do that, the original support bolt can be used but only after you cut a 1-7/8" length of hollow tube and use it as a spacer to keep the backs of the coils separated when you tighten the bolt. This is strictly for alignment & to keep from stressing the coils as you tighten the rear mount bolt. When I first realized that I needed a spacer of sorts, I didn't have anything appropriate so I used copper tubing that was too big and that had already oxidized as shown in the picture below. Afterwards, I realized that a short piece of stainless steel brake line was just perfect - that's what's in the parts picture at the top of this page. I bought the shortest piece I could to minimize cost (8") and made sure that it was 5/16" outside diameter and about a 1/4" inside diameter which is just big enough to pass the rear coil bolt through. When it's all done, you only have to insert the tube & tighten the bolt, then slide in the support rod and secure it with the cotter pin. Radiator Reservoir Access Others I've spoken to who made changes to their original butterfly bracket were later completely unable to access their radiator overflow reservoir because one of the coil towers rested on the reservoir cap. With this hanging arrangement and straight boots on the front coil outputs, it's awkward but the reservoir cap can still be removed to fill in coolant. Access to the reservoir cap can be improved by shifting the entire reservoir out a quarter inch as I've done on my own X. To do so, you'll need multiple ¼" spacers and longer reservoir mounting screws but it's not more complicated than that. The slight outward shift will bring the reservoir cap farther away from the front left coil boot and place the cap in a more accessible location in relation to the horn mount and surrounding elements. I've made this reservoir adjustment and I'm able to refill coolant without too much trouble. Summary The most difficult part of this project is sourcing the spark plug wires, the two types of boots and the connectors. Once you have those, the rest of the job is mostly problem-free. I say "mostly" because it's still a bit of a problem to bend the steel support rod to perfection without fancy tools and it can be quite awkward to get the coil bracket into place with the Dyna Coils already mounted to it.. But even so, it can be a job for a single person in a single evening (although it's a lot quicker with a second set of hands nearby). If I haven't been clear or have left some details out, feel free to e-mail me for clarification or additional information. I hope this helps other Maxim-X owners with their Dyna Coil conversion woes. | ||||||||||||||||||||||||||||||||||||||||||||||||||||||||||||||||||||||||||||||||||||||||||||||||||||||||||||||||||||||||||||