|
Vacuum Petcock The Problem & The Solution |
||||||||||||||||||||||||||||||||||||||||||||||||||||||||||||||||||||||||||||||||||||||||||||||||||||||||||||||||||||||||||||||||||||||||||||||||||||||||||||||||||||||||||||||||||||||||||||||||||||||||||||||||||||||||||||||||||||||||||||||||||||||||||||||||||||||||||||||||||||||||||||||||||||||||||||||||||||||||||||||||||||||||||||||||||||||||||||||||||||||||||||||||||||||||||||||||||||||||||||||||||||||||||||||||||||||||||
|
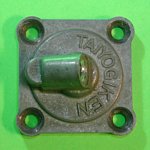
Leaky Petcock - Problem Described Among some common "issues" experienced by the Maxim-X is a leaky petcock that can lead to some extreme circumstances The Maxim-X comes equipped with a vacuum-operated petcock that is automatically OFF when the engine isn't running. Vacuum from the running engine is used to open the petcock and allow fuel to flow when switched to ON or RES. However, after the passage of time, the Maxim-X petcock may begin to leak internally. Despite a non-running engine, fuel can begin to leak past the vacuum diaphragm's plunger seal and into the carburetor float bowls when no fuel is expected. If this happens in combination with a leaky float valve or two, then it's possible that even when the bike is unused, fuel will leak through the petcock, into the float bowls, past the leaky float valve(s) until the fuel eventually overflows into the intake boots. If that happens, it's only a matter of time before the excess fuel finds its way through the intakes into the cylinders and past the pistons into the crankcase. Leaky Petcock + Leaky Float Valve(s ) = Fuel In Engine Oil THAT'S NOT GOOD... but at least it's easy to check whether the condition exists. To check for this worst case scenario, begin by removing the fuel hose from the petcock with the petcock set to RES and, of course, the engine OFF. Aside from a momentary dribble from opening things up, there should be no fuel at all. If there is a continual flow of fuel, no matter how small, then it's necesary to repair or replace your petcock. If your petcock leaks as described, you should immediately check for some possible repercussions. Open the oil filler cap on the right side of the crankcase and stick your nose inside. If you smell fuel in the crankcase, it necessarily means that you have both a leaky petcock and at least one leaky float valve in one of the carburetors... possibly more. It happens surprisingly often - so often, in fact, that I now regularly remove the fuel hose from my own petcock just to verify that it isn't leaking. I also smell the oil each time I do an oil/filter change just to be sure. If you're unfortunate enough to find this condition, it means you'll have to repair your leaky petcock and you'll also have to look after the leaky float valve(s). For the float valves, often it's enough to do a "HARD" SeaFoam treatment or two to clean out the crud that might be causing the valves to stick but just as often it's necessary to remove the carb rack to open the float bowls and service the float valves. This problem isn't something you can simply ignore, but looking after it can fortunately be done at a reasonable cost and without too much difficulty (well, that's debatable). Whatever the repercussions, the first step is to resolve the leaking petcock problem for which there are two possible solutions - complete petcock replacement or petcock repair. The choice is yours. Solution #1: Petcock Replacement All models of Maxim-X are equipped from the factory with a vacuum operated TAIYOGIKEN petcock which is identified in the Yamaha Parts Database as follows:
Strangely, although there's only one petcock referred to in the parts database, there seem to be two distinct types. Both types of petcock are indentical except for a drain screw on one which doesn't exist on the other. If you're not comfortable trying to rebuild the petcock yourself, then the entire assembly can still be purchased directly from your nearest Yamaha dealer for as little as USD $56.91. However, you'll likely find that the Petcock Assembly is backordered as I discovered when I checked on October 23, 2006. Nevertheless, if you're determined to buy a complete unit, you can use the information in the table above to identify the assembly when asked by the folks at the parts counter. If the price of a new Petcock Assembly is more than you're willing to spend but you're still determined to replace the unit as a whole, then you'll have to start checking used parts suppliers worldwide. When you do, it will be helpful to know all the Yamaha models which share the same petcock assembly. You'll find them all listed in the following table (all Maxim-X models are shown in red):
Most often people intend to replace their petcock with one that's identical but that isn't necessary. It's certainly easier to replace it with something identical but it's also possible to replace the leaking petcock with something entirely different, like a manual petcock in place of the vacuum-operated one. The choice is yours but if you opt for a manual petcock, you'll have to trust that you're diligent enough to shut it off when you park your bike because you'll no longer have the luxury of the automartic shut-off provided by a vacuum-operated petcock and that can lead to all the same problems. Solution #2: Petcock Repair Whether new or used, it's often difficult to find an identical petcock to replace your troublesome one so a more common choice is to repair or rebuild instead. If that's your choice, the best place to start is by buying a Petcock Rebuild Kit. One place that stocks the right kit regularly in Sirius Consolidated Inc. in Kitchener, Ontario. I've listed their contact information below together with what you'll need to identify the petcock rebuild kit for the Maxim-X:
Sometimes it's not necessary to buy a complete rebuild kit. If it's just the vacuum diaphragm that you need, it can be purchased separately either from Sirius Consolidated or even from Kawasaki as follows:
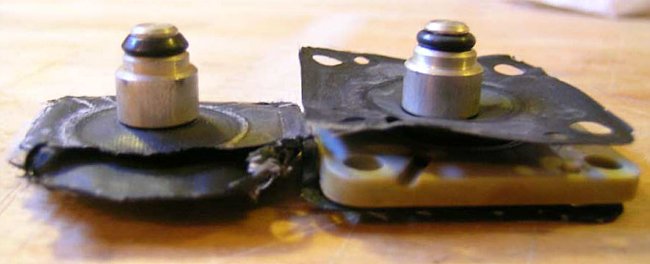
Petcock Rebuild Kit "Issues" A petcock rebuild kit is a great place to start but what wasn't known until lately is that the stock diaphragm assembly installed by Taiyogiken in the Maxim-X petcock isn't entirely the same as the diaphragm assembly in the rebuild kits that are being sold today. Let's start with a side-by-side comparison of the two diaphragm assemblies:
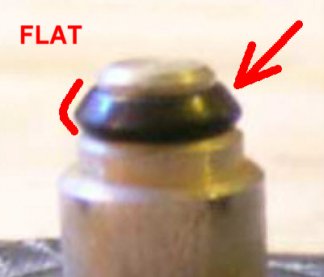
Ignore the fact that the plastic centre portion of the diaphragm assembly is missing at the left in the picture above - it's the only picture I had. Aside from that obvious and unimportant difference, it should be abundantly clear that the plunger seals are not the same. Have a closer look look at the difference below:
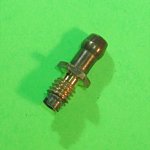
In addition to the shapes of the seals being substantially different, there are two more unseen differences. First, the stock seal is hollow while the replacement o-ring is not. And second, the stock seal is much more pliable than the stiffer o-ring used in the replacement part. These three differences contribute dramatically to the failure of the Maxim-X petcock rebuild kits... but they're not the only problem. Even if the seals were the same, the plunger found in the K&L kits is also a little shorter than the stock plunger. The difference isn't much, but it's enough to prevent the o-ring in the kit from making a solid seal against the valve seat... but that's still not the only problem. As it turns out, even if the seals were the same and the plungers were identical lengths, it's the machining of the body of the stock Taiyogiken petcock that's the fundamental, underlying problem.
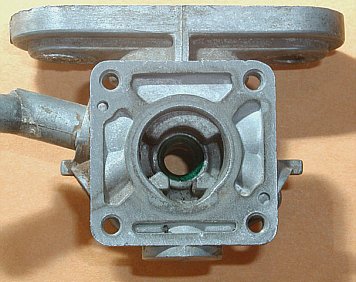
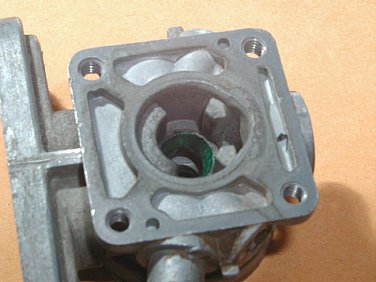
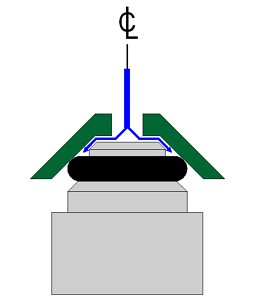
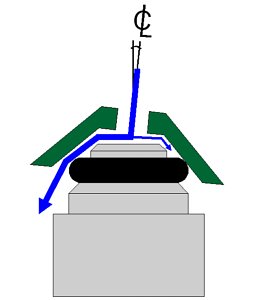
With some experimenting it became apparent that the plunger valve seat shown above and below in green isn't always machined perpendicular to the travel of the plunger. The diagrams below illustrate the problem more clearly, albeit in an exaggerated way.
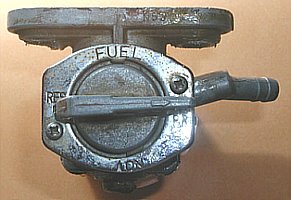
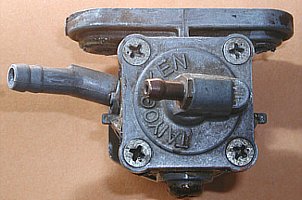
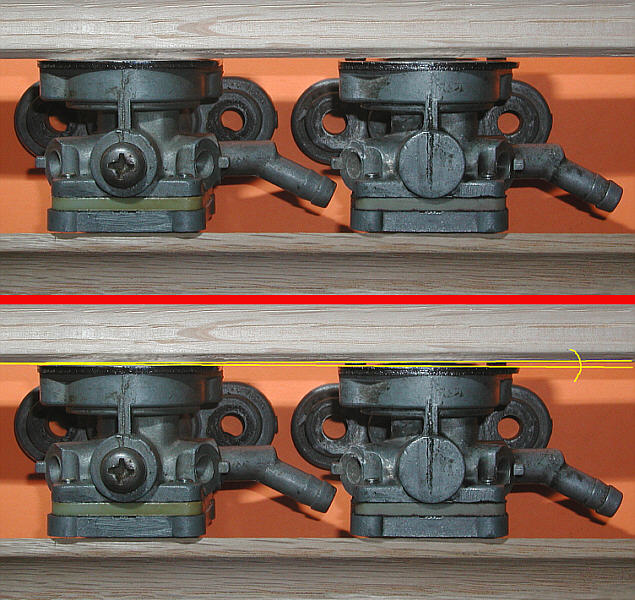
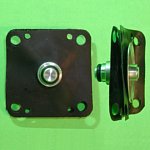
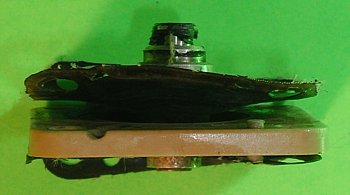
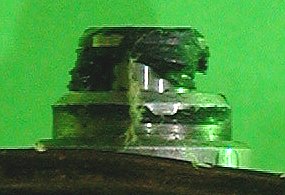
I suspect that either Yamaha or Taiyogiken may have realized that the machining of the valve seat wasn't as reliable as it should have been and so to overcome the plunger and valve seat alignment issue, they simply installed a tapered, hollow, more flexible seal that would conform to the seat regardless of the small misalignment. That solution was fine for them in 1985/86 but today it's no longer possible to source the stock seal so the problem becomes one of adapting the K&L Petcock Rebuild Kit to the imperfections and dimensions of the stock petcock body. A short time after discovering the petcock casting alignment issue, I realized that the misalignment could be identified from the exterior of the petcock. It was only by chance that I had two different petcocks side by side and could draw the following comparison:
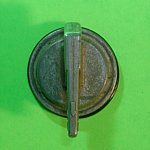
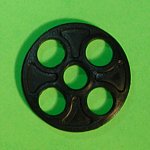
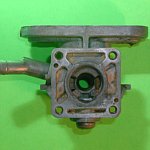
A closer examination of the picture above shows that, at least in this case, a petcock with a drain screw (above left) showed casting misalignment that was visible to a keen eye (mine anyway). The petcock without a drain (above right) had no such casting misalignment. Although I'd love to be able to say that all petcocks with drains are crooked and all petcocks without drains are fine, that just isn't substantiated... not yet. I'll have to examine a lot more petcocks before I can officially make that claim but unofficially, it's something to look for. If a visual inspection of the exterior of a petcock can reveal the dreaded casting misalignment, it might save a handful of people the trouble of attempting a rebuild and failing. The machining imperfection of the stock petcock is an unfortunate reality but that, and the length of the plunger, can be corrected fairly easily with the right tools and some instruction. Disassembly & Parts Identification The obvious place to start is by disassembling and cleaning the various parts of your petcock. It's a problem-free but necessary exercise and it will help you become more familiar with the petcock and the interaction of its parts. Although you may be equipped with a petcock rebuild kit, don't assume that you'll be throwing out any old parts. If you mistakenly tear a seal, puncture a diaphragm or something equally unfortunate, the original parts might come in handy. You should take care to disassemble the petcock without doing any damage at all... if possible. When you begin your disassembly, assume that the petcock is full of fuel, fuel additives and possibly even cleaners. Unless you're absolutely certain that it isn't, you should work on an appropriate surface. The stock petcock has twenty (20) individual parts. I've listed them in the order that they would be removed during disassembly of the petcock (I would have posted an exploded view diagram but that might take a while to create - until then this will have to suffice):
As you disassemble the petcock (A thru P), there are a few steps that aren't necessary and only a few small things to worry about:
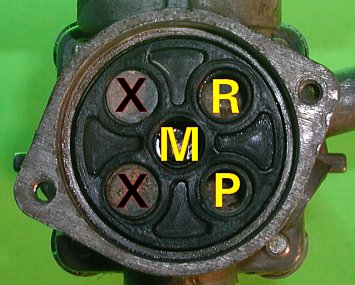
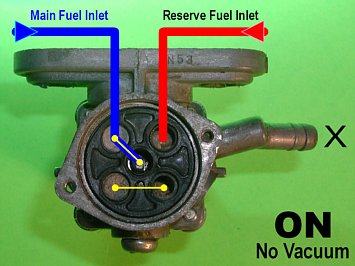
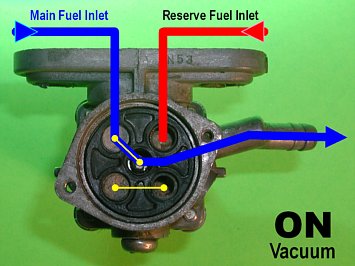
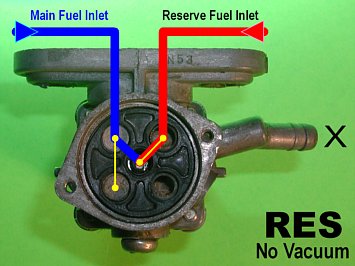
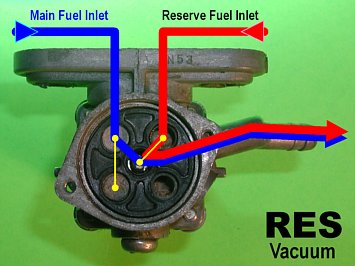
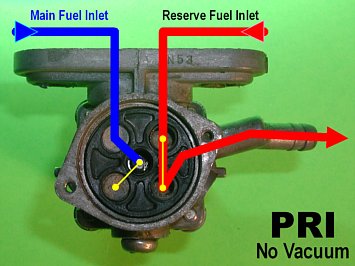
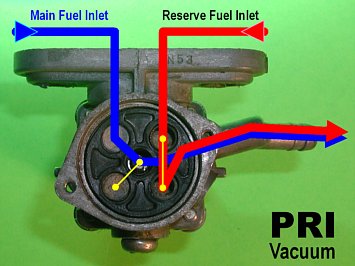
Petcock Fuel Routing To make sense of some of what's been mentioned above, it might help to understand just how the petcock actually works and how the selector gasket and spigot interact to control the direction of fuel flow. Hopefully the table and images below will make that clear:
External Leaks - Possible Causes Although this part of the web site is primarily provided to resolve the common Maxim-X petcock problem of Internal Leakage, several people have contacted me to ask what might be causing their petcock to exhibit External Leakage. So I've decided to add this section as well.
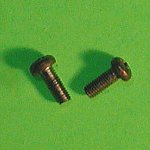
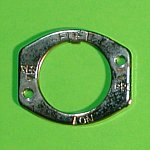
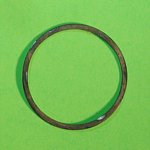
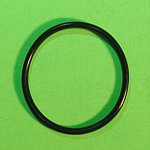
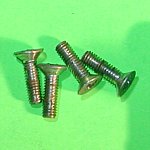
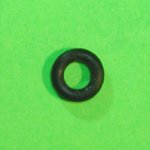
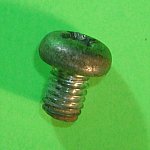
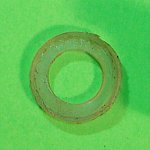
I'll do my best to describe each of the above possible causes of external petcock leakage and how they might be resolved. 1. Loose or damaged mounting screws If your petcock is leaking externally, the problem may be as simple as loose mounting screws. There are no torque specifications that I could find so use your own judgement but avoid over-tightening because it might be harmful to the fibrous sealing washers under the screw heads. If the petcock mounting screw Philips heads have been stripped and you'd prefer to replace them, the screws are still available from Yamaha under Part #98517-06020-00 for about USD $0.99 (April 2007). 2. Base o-ring worn, damaged or loose There's an o-ring (in the shape of an oval actually) between the petcock and the gas tank. If your petcock is leaking externally, that o-ring may no longer be doing what it should or maybe the petcock mounting screws have loosened causing a leak past the o-ring where the petcock joins the gas tank. A petcock rebuild kit would contain a new base o-ring. Currently, you can replace the o-ring with Yamaha Part #2G2-24512-00-00 for about USD $4.40 (April 2007), however, I've found that a typical R28 o-ring (AS-568-222, 1¾"OD-1½"ID-1/8th section) will work just as well. It's not identical in size but the cost is certainly less than a dollar. 3. Mounting screw seals worn, damaged or loose If your petcock is leaking externally, it's possible that the fibrous sealing washers between the petcock mounting screw heads & petcock casting are worn, damaged or loose. If you're sure the leak originates at those seals, tightening the petcock mounting screws to put more pressure on the seals might be enough to end the leak. The sealing washers aren't soft or flexible. They're fairly dense - dense enough to allow the mounting screws to be tightened without compressing the seals much so it should be possible to tighten the moounting screws without deforming the seals. If the leak continues after tightening the mounting screws, it may be necessary to replace the seals. Currently they're still available from Yamaha under Part #90202-05187-00 for about USD $0.99 (April 2007). I haven't been successful in finding those particular sealing washers anywhere else. 4. Perforated vacuum diaphragm The petcock's vacuum diaphragm may be perforated, allowing fuel to leak to the otherwise dry side of the diaphragm. You might need a new diaphragm if that's true. If the diaphragm is perforated, fuel may be leaking out the vacuum hose nipple, or between the outer diaphragm layer and the petcock vacuum cover mating surface. There's nothing you can do if it's leaking out the hose nipple. That would be resolved by replacing the diaphragm. But if fuel is leaking from the back cover mating surface, you might have to sand the back cover to a smooth & straight finish. Don't use any sealant in the petcock anywhere - it will be broken down by the fuel and will inevitably plug something up. The new diaphragm and refinished mating surface should suffice. 5. Worn or damaged spigot o-ring Fuel could also leak from around the spigot (the lever). If that's what you're seeing, it could result from four different possibilities: 6. Weak or broken spigot wave washer Fuel could also leak from around the spigot (the lever). If that's what you're seeing, it could result from four different possibilities: 7. Pitted spigot mating surface Fuel could also leak from around the spigot (the lever). If that's what you're seeing, it could result from four different possibilities: 8. Worn or damaged selector gasket Fuel could also leak from around the spigot (the lever). If that's what you're seeing, it could result from four different possibilities: 9. Loose fuel outlet tube The fuel hose outlet is actually press-fitted into the petcock casting. If there's some leakage around the base of the fuel hose outlet where it enters the casting, it may be that the hose outlet just needs to be pressed farther into the casting. That's best done in cold weather and without any real force - just twist it farther into place. 10. Worn or damaged drain screw seal There's a drain screw and sealiong washer at the very bottom of the petcock. It's possible that the screw is loose or the sealing washer isn't doing what it should anymore. It's a plastic washer that's difficult to replace. Don't tighten the screw too much - it's only a aluminum after all. 11. Loose petcock drain screw There's a drain screw and sealiong washer at the very bottom of the petcock. It's possible that the screw is loose or the sealing washer isn't doing what it should anymore. It's a plastic washer that's difficult to replace. Don't tighten the screw too much - it's only a aluminum after all. 12. Fuel tank leak above petcock Sometimes the gas tanks of Maxim-Xs begin to rust along a crack on the underside of the tank just right of the petcock. This is particularly common when people unknowingly park their bikes over the winter with an empty, or near empty, tank of gas. The unlined metal surface of the tank is then exposed to air and rusts very quickly. The bike should always be parked with a full tank... as full as it gets. If there is such a rust crack and it's small enough, fuel could slowly seep out and flow over the petcock on its way out. There are good ways and bad ways to seal leaking tanks - most shops do it the BAD way and use the cheapest sealant called Kreem. You're better off doing it yourself with the help of the experts in the XJ Owners Group. Internal Leaks - Possible Causes Understanding the function of the Maxim-X petcock and the way fuel is routed as described above is essential in understanding the possible causes of internal leaks.
I'll do my best to examine each of the above causes and to provide solutions for all of them. 1. Varnish or Debris Buildup Interferes With Plunger Valve If your Maxim-X was parked for a long time without fuel stabilizer and you find that your petcock leaks fuel to the carbs when fuel isn't expected, it's possible that varnish buildup and debris in the petcock are interfering with the proper function of the plunger valve. Either its motion is no longer free or something has collected between the plunger seal and valve seat. In either case, a good cleaning might solve the problem and allow the valve to seal properly again. If you suspect this might be the problem, rather than immediately opening the petcock for inspection or repair, a few SeaFoam treatments might suffice. SeaFoam will breakup & dissolve the varnish & might allow it and any suspended debris to flow freely out of the petcock thereby possibly restoring proper valve function. It's wishful thinking, and more than likely the leak is due to something else but it certainly can't hurt to go through the motions, if only to eliminate varnish buildup from the equation. A word of caution, however - this shouldn't be done without a fuel filter between the petcock and carburetors. 2. Damaged Plunger Valve Seat If your Maxim-X petcock leaks fuel to the carburetors when fuel isn't expected, it's remotely possible that the cause is valve leakage from a damaged plunger valve seat. Perhaps oxidation or scarring from some form of debris have harmed the surface of the valve seat making a fuel-tight seal impossible. Again, this is probably wishful thinking because the valve seat isn't likely to oxidize and because the sort of debris found in petcocks generally isn't capable of doing that level of damage. The condition of the plunger valve seat generally remains unchanged but it's still worth a quick glance to verify that your leakage problem doesn't begin there. If the condition of valve seat is the source of your leak then it's possible to polish the surface of the seat with a mild abrasive and what I like to call the "Reverse Golf Tee" method - more on that later. 3. Worn or Damaged Plunger Seal If your Maxim-X petcock leaks fuel to the carburetors when fuel isn't expected, it's very likely that the cause is valve leakage from a worn or damaged diaphragm plunger seal.
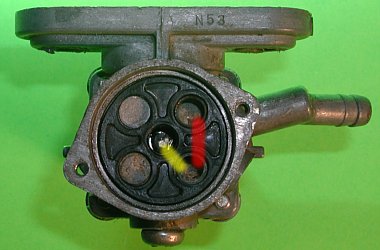
Not all seals are quite as bad as the one shown above when they start to leak. They may never look as bad but they wouldn't have to to allow fuel to leak past. Over time, the seal material will degrade from age. It can also be damaged by inappropriate fuel additives. Since the stock seals are actually hollow and fairly thin, another reason they might become damaged is simply due to the constant cyclic loading and unloading of the material as the plunger valve opens and closes, especially if the petcock was allowed to sit dry for an extended time. Whatever the reason, once the stock seal fails, leakage is inevitable. 4. Worn or Damaged Selector Gasket or Spigot If your Maxim-X petcock leaks fuel to the carburetors when fuel isn't expected, it might be due to a worn or damaged selector gasket or possibly due to oxidation and pitting on the mating surface of the spigot. Together with the selector gasket, the position of the spigot defines the direction of fuel flow through the petcock as described above, but if the gasket doesn't seal as well as it should, there's a potential for cross passage leakage which could lead to fuel flow to the carburetors despite the absence of an engine vacuum. In the fuel routing section above, the passage labeled "P" (Prime) in the first picture bypasses the plunger valve altogether. Any fuel which reaches that passage will exit the petcock and reach the carburetors regardless of engine vacuum.
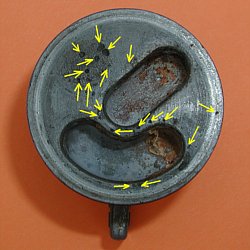
Consider the two possible paths of fuel leakage (red, yellow) indicated in the left picture above on either face of the selector gasket. Fuel leaking along those paths would bypass the plunger valve as if setting the petcock to PRIME. Also consider the pitting marked in the right picture above on the mating surface of the spigot. With enough pitting along the small barrier between the two fuel channels, fuel would be allowed to leak from one channel to the next. If you refer back to the yellow spiggot channel markings in the fuel routing diagrams above, you can see that spigot cross-channel leakage would send fuel out the prime passage (labeled "P"), bypassing the plunger valve whenever the spigot is set to ON or PRI, regardless of vacuum. Only the RES position is unaffected by spigot cross-channel leakage because that spigot position doesn't connect any passages to the PRIME passage. If your petcock leakage is due to spigot pitting and cross-channel seepage, the problem can be resolved by polishing the mating surface of the spigot to a perfectly flat & smooth finish. 5. Weak or Damaged Diaphragm Return Spring If your Maxim-X petcock leaks fuel to the carburetors when fuel isn't expected, it could be because the diaphragm return spring isn't applying enough pressure against the diaphragm assembly to force the plunger seal against the plunger valve seat. Although these diaphragm return springs appear to be made of stainless steel, they're not perfect and can corrode and relax a little over time. I've been told that in extreme cases the springs might even break but I've never seen one broken myself. Whether broken or just relaxed, the outcome is the same - insufficient force to seal the plunger valve reliably which then allows fuel to flow to the carburetors regardless of the absence of engine vacuum. To resolve this problem, the spring can be carefully stretched to a minimum length of 19mm (49/64")... somewhat longer if a plunger length adjustment is required. 6. Poor Alignment of Valve Seat In Petcock Body An infinitely less obvious reason for internal petcock leakage only surfaces after the installation of a petcock rebuild kit and even then, the problem is all but imperceptible. After some investigation, it became apparent that the stock Taiyogiken petcocks installed on every Maxim-X were inconsistently machined such that the plunger valve seat isn't always perpendicular to the direction of plunger travel. From the factory, the original plunger seals conformed easily to the valve seat misalignment because they were more flexible but the stiffer o-rings in petcock rebuild kits do not. Read more about the valve seat alignment problem above. If your leak stems from a misaligned valve seat, that too can be resolved by polishing the valve seat using the "Reverse Golf Tee" method mentioned in section #2 above - more on that later. 7. Perforated Diaphragm Many people believe that a damaged vacuum diaphragm can lead to unexpected fuel to the carburetors in the absence of an engine vacuum (ex. when the motorcycle is parked), but that isn't so. In the absence of an engine vacuum, a perforated diaphragm doesn't contribute to fuel flow or leakage to the carburetors in any way. With an engine vacuum, a perforated diaphragm will actually prevent fuel from flowing reliably to the carburetors. Depending on the degree of perforation, fuel may reach the carbs in pulses or not at all. That's not to say that a perforated vacuum diaphragm wouldn't result in some kind of internal leakage - it does. A perforated diaphragm would result in fuel leakage out the vacuum hose nipple (G). Again, the degree of perforation would determine the degree of leakage but some level of leakage would result with or without an engine vacuum - but to a greater degree with an engine vacuum. If fuel in your crankcase is your concern, this kind of leak would get the fuel there much more directly. Fuel wouldn't have to pass through the petcock valve, through the fuel filter (if it exists), into the float bowls, past leaky float valves and eventually into the intake manifold(s). Instead, fuel could leak directly into the #2 intake manifold via the petcock vacuum hose. This kind of leakage is potentially a much bigger problem but at the same time, it's not likely to go unnoticed as a leaky plunger valve would. First, this kind of leakage will only effect the #2 cylinder (or #3 if your vacuum hose is connected there instead) so an engine imbalance is likely and will draw your attention fairly quickly. Second, even a small diaphragm perforation will begin to starve off the fuel supply to the carbs and that will also be quickly apparent. Third, as fuel leakage through a diaphragm perforation increases, fuel flow to the carbs inherently decreases. If the leak were large, there would almost certainly be no fuel flow to the carburetors at all and, in that case, the engine simply wouldn't start which would again draw attention to the problem. So while a diaphragm perforation has the potential of doing the most damage, there's no way the problem would go unnoticed long enough to do any real damage. Petcock Repair Instructions Although there seem to be a lot of potential ways that a Maxim-X petcock can begin to leak internally, the good news is that it's all manageable and fairly easy to repair.... with these instructions anyway. There seems to be some variability related to leaky petcocks and repair issues. Some people have complete success with their petcock rebuild kit installation and don't require any additional modifications whatsoever while others try to repair their petcocks over and over again but have persistent leaks. Some have trouble with only a single element like the plunger seal or the vacuum diaphragm, but others need to fix everything that's been previously mentioned. The range of trouble varies quite a bit and it's clear that that is a result of inconsistencies in petcock machining and due to possible differences in petcock rebuild kit components. These instructions cover repairs to all possible leak causes (that I could think of) as well as problems with some petcock rebuild kits - a sort of worst case scenario. It won't apply to everyone equally but there's bound to be something helpful in in here for everyone. I hope this takes some of the mystery out of why so many people are unsuccessful in reparing their leaky vacuum petcocks. With any luck, we'll never hear about K&L petcock rebuild kit problems again |
||||||||||||||||||||||||||||||||||||||||||||||||||||||||||||||||||||||||||||||||||||||||||||||||||||||||||||||||||||||||||||||||||||||||||||||||||||||||||||||||||||||||||||||||||||||||||||||||||||||||||||||||||||||||||||||||||||||||||||||||||||||||||||||||||||||||||||||||||||||||||||||||||||||||||||||||||||||||||||||||||||||||||||||||||||||||||||||||||||||||||||||||||||||||||||||||||||||||||||||||||||||||||||||||||||||||||


